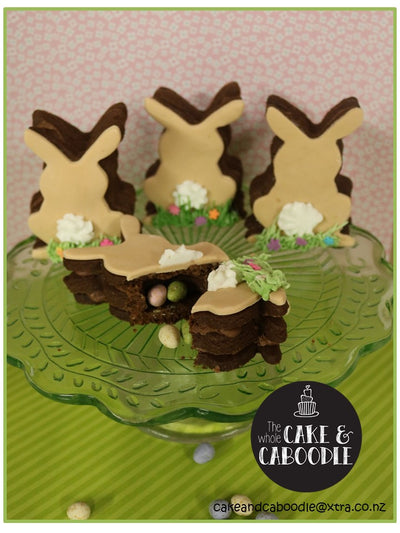
How to make 3d Easter cookies
These fun Easter cookies, can be made using any Easter themed cookie cutters - such as eggs, bunny faces and more. Perfect at any time of year, simply alter your cutter shape and fillings to suit your seasonal theme
Bake your chosen shape cookies using a no spread cookie dough. Roll dough to approx. 5-6 mm and chill well. For intricate parts such as bunny ears, you may need the aid of a paintbrush to help push the dough from the cutter, so as not to distort it.

Each cookie is created using 3x bunnies. One bunny should have the centre removed. Cut the centre big enough to hold some treats – use walker mini eggs, (Cadbury brand eggs that are currently available are too big). Be sure not to fill centres with something that doesn’t stick up above cookie.

To stick the cookies together, you can use melted chocolate or royal icing with cocoa and some brown food colouring to stick together. Ice near the edge but not too close, Icing needs to be not runny - or it will drip
Firstly stick the base bunny and one cut out middle bunny together and let dry a bit. You don't want to add your filling and top bunny too soon, it is too much weight and will cause your icing to ooze out before it sets. Once set, fill bunnies and follow same steps to glue last bunny in place.

To decorate your bunnies – Glue rolled fondant to cookie with sugar syrup or edible glue. Grass is piped using grass tip 233, Pipe from the bottom upwards Then randomly place on wee flowers, more eggs, carrot sprinkles, use star tip to make bunny tail. You need to stick things as you pipe grass, so the royal icing doesn’t dry before you can use it as glue.
Thanks to Lisa from The Whole Cake and Caboodle for her Easter cookies